In this post, I’ll walk you through the environment I’m currently using for secure access to the internet and email services. The setup is designed with security in mind, and involves a host machine with two virtual machines (VMs). The host manages the connections through a custom firewall configuration, ensuring proper isolation between the VMs and the internet. Let’s dive into the specifics!
Overview of the Setup
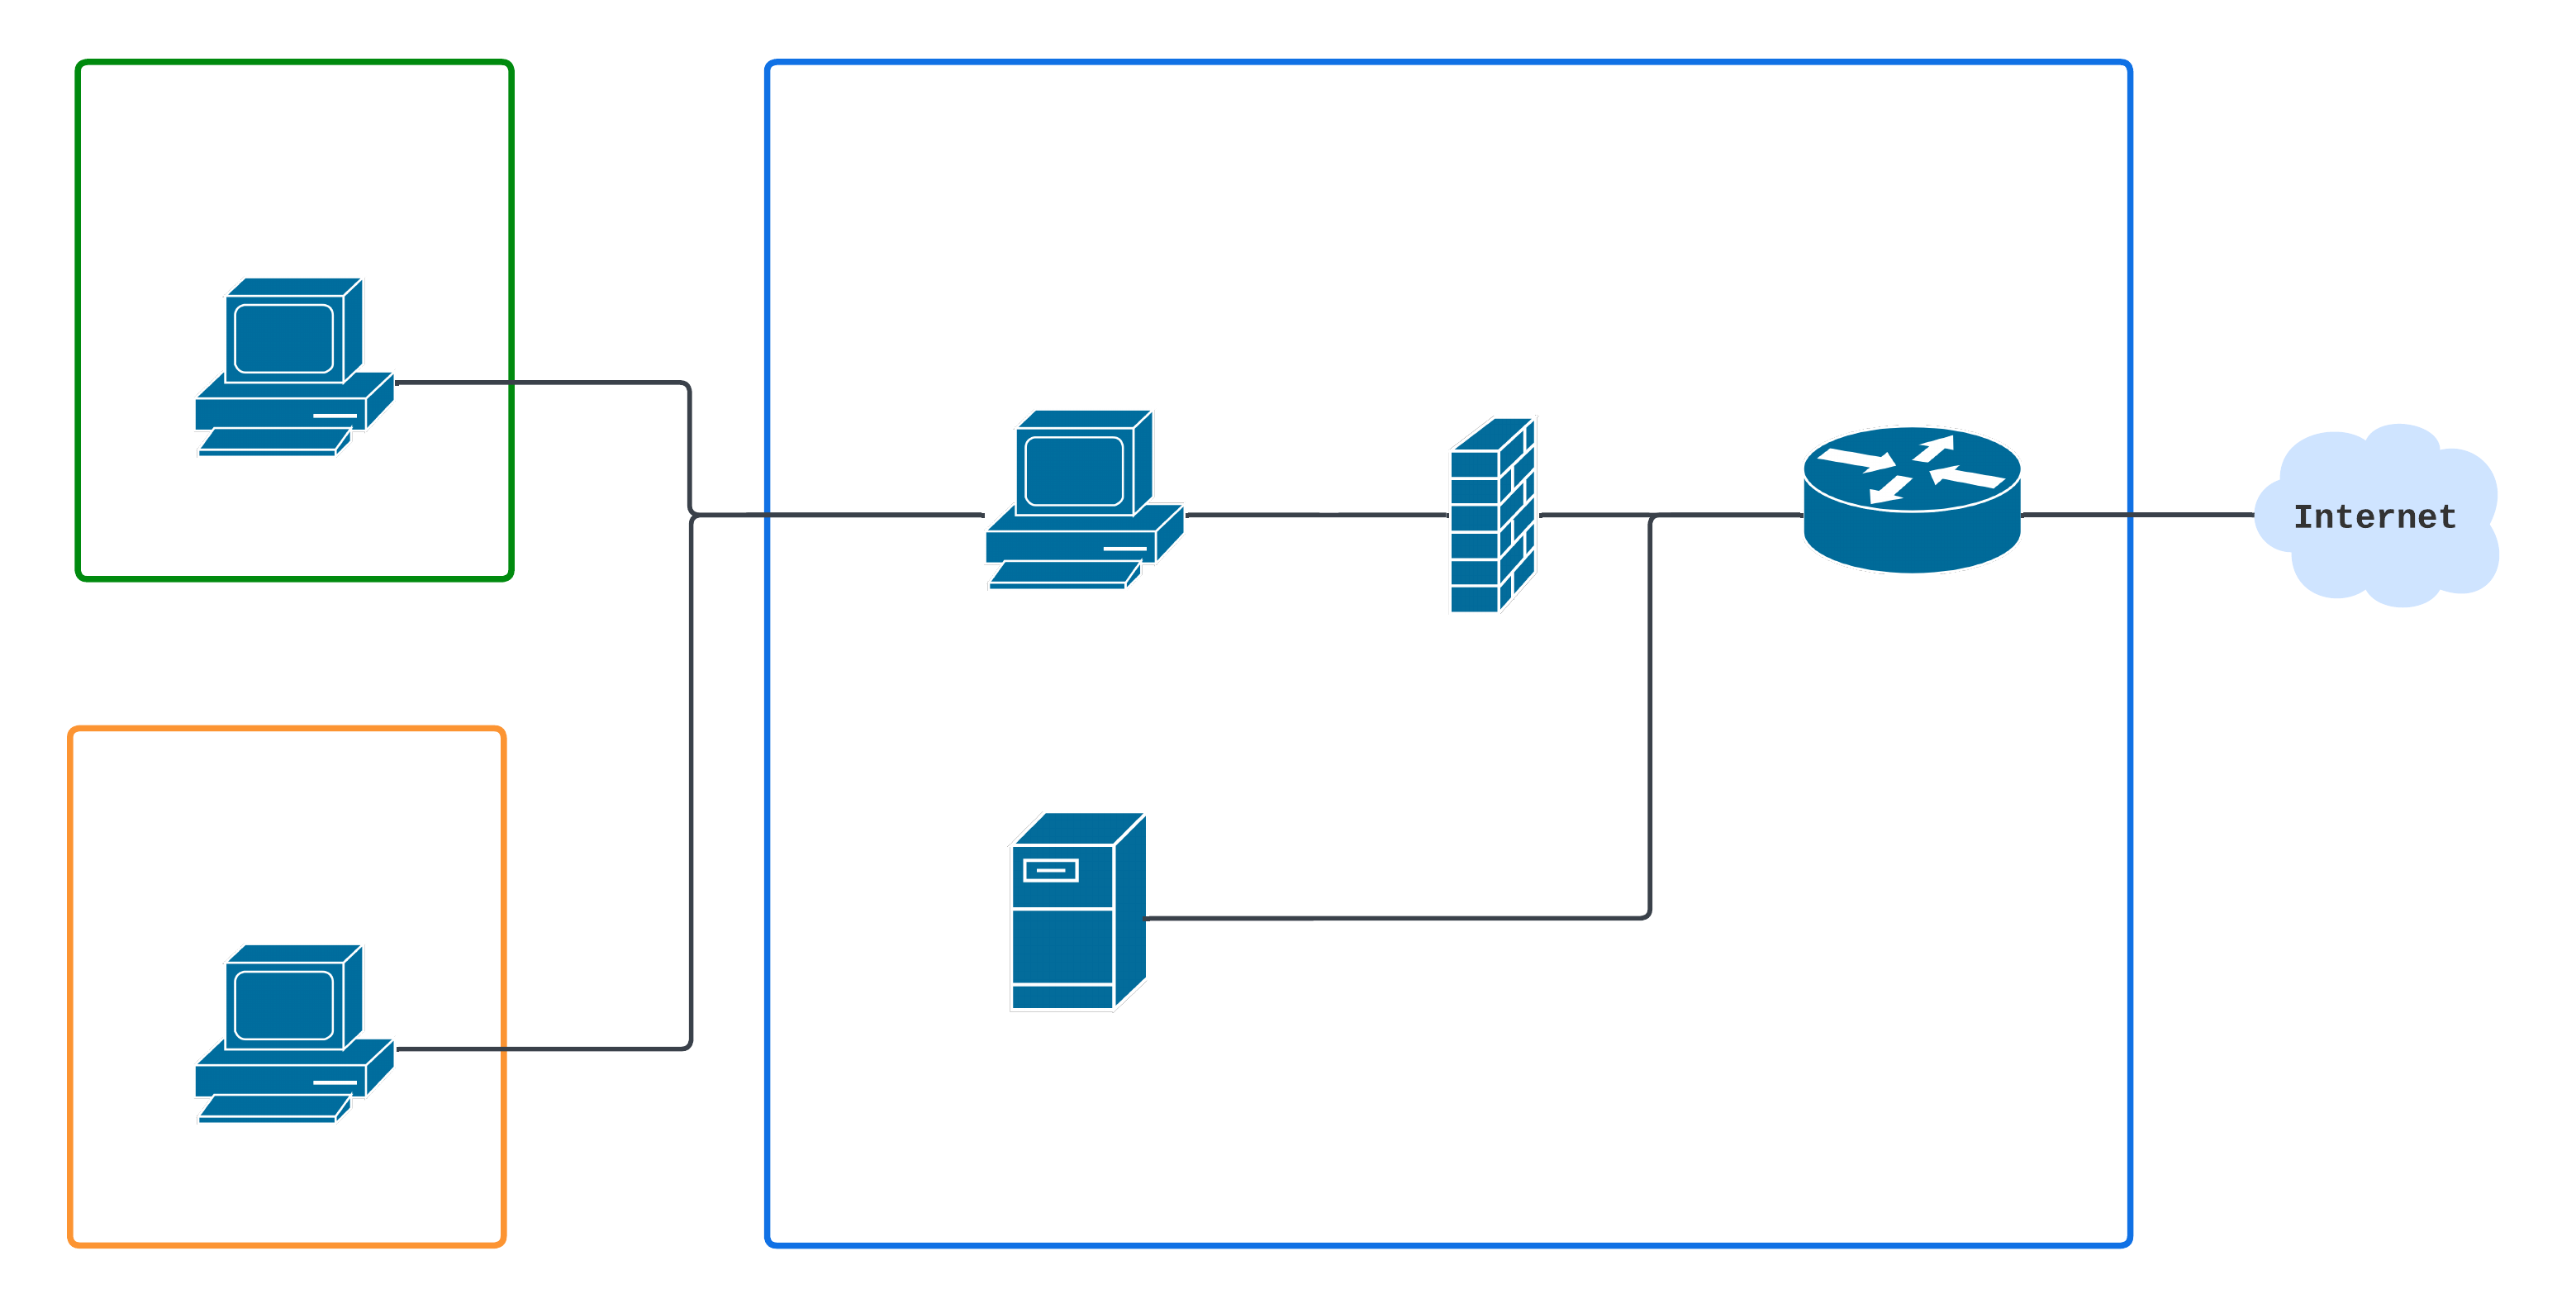
The environment consists of:
- Host Machine: Running a firewall and managing network traffic. The host machine has a static IP (192.168.1.194). Can only be updated when the firewall rules are disabled.
- Mail VM: Dedicated for accessing email.
- Internet VM: Dedicated for accessing the internet.
- DNS Server: The DNS server is located in a machine that has a static IP address (192.168.1.206).
Both VMs are set up on VirtualBox and have host-only network adapters configured. This allows them to interact with the host, while traffic to the outside world is carefully filtered through the host’s firewall.
Here is a detailed diagram of the architecture:
VirtualBox Networking Modes
VirtualBox offers different networking modes for VMs, each suited for different use cases. Let’s explore the most common options:
- NAT (Network Address Translation):
- Default mode for new VMs.
- The VM is placed behind a VirtualBox NAT device, making it appear as a single device from the host’s perspective.
- Pros: Easy to set up and allows the VM to access external networks (e.g., the internet) without additional configuration.
- Cons: Limited to outgoing connections. Incoming connections (e.g., SSH into the VM) require port forwarding.
- Bridged Networking:
- The VM is directly connected to the physical network interface of the host.
- Pros: The VM gets its own IP address from the network, making it appear as if it’s a separate machine on the LAN. This mode is ideal when the VM needs full access to the local network.
- Cons: Requires more configuration and may conflict with certain network security policies. The traffic produced by this VM is directly put in the interface, avoiding any filter defined in the firewall.
- Host-Only Networking:
- The VM is only accessible from the host machine and other VMs on the same host-only network. It does not have internet access by default.
- Pros: Excellent for isolated environments where the VM should only interact with the host.
- Cons: No internet access unless additional routing is configured.
- Internal Networking:
- Similar to host-only networking, but the VM is completely isolated and can only communicate with other VMs on the same internal network.
- Pros: Useful for scenarios where VMs need to talk to each other but should be isolated from the host and external networks.
- Cons: No direct host or internet access.
- NAT Network:
- A variation of NAT mode, but with better networking between VMs. VMs can communicate with each other and the outside world, but remain behind a NAT.
- Pros: More flexible than standard NAT mode, with support for internal VM-to-VM traffic.
- Cons: Similar to NAT, incoming traffic to the VMs is restricted.
In this setup, I used host-only networking to isolate the VMs from external networks and manage traffic through the host’s firewall. This mode ensures that all VM-to-internet traffic is filtered and controlled via the custom firewall rules on the host.
Configuration
First, I have created two Virtualbox VMs that will use Lubuntu as the Linux distro, with a minimal amount of cores and RAM (1 core and 2GiB for the Mail VM and 2 cores and 4GiB for the Internet VM). Here I wanted to use a lightweight distribution as I will do lightweight tasks, such as acces to the internet and check my email.
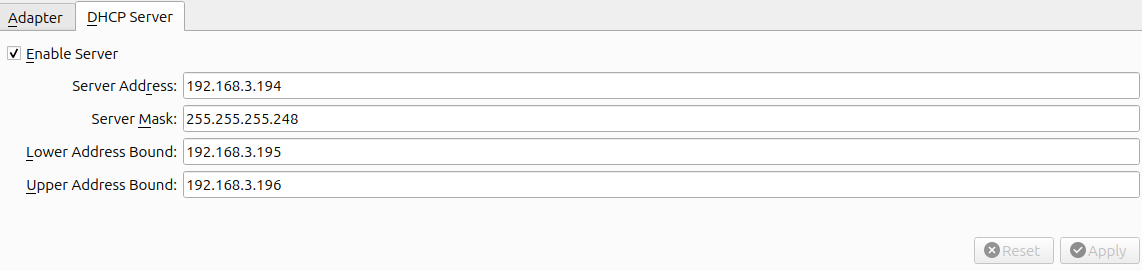
Once created I have configured two Host-only adapters, one per VM. For the Mail VM the adapter has the name vboxnet0 and has the following settings:


For the Internet VM the adapter has the name vboxnet1 and has the following settings:

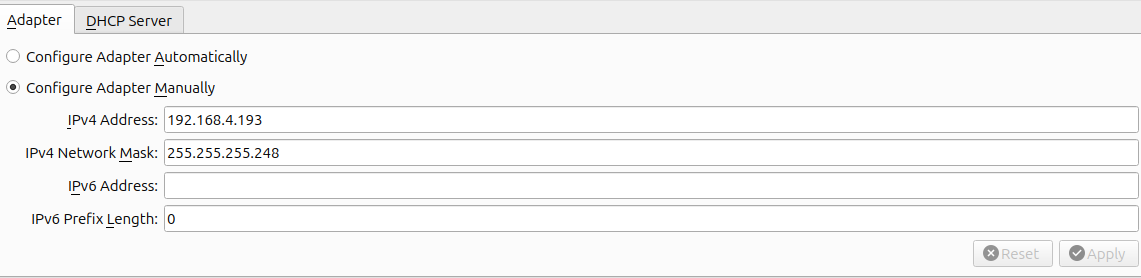
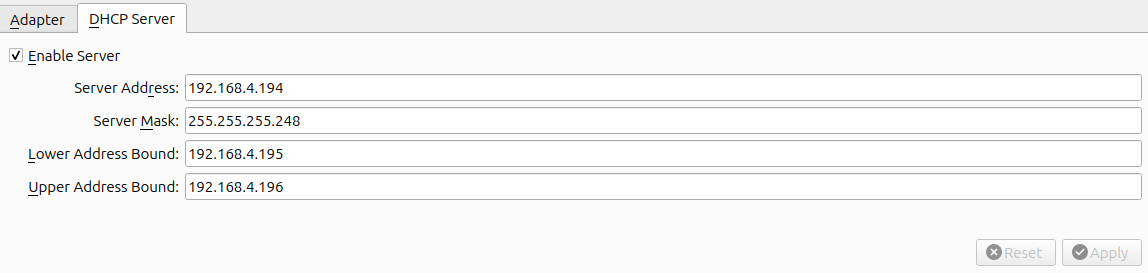
Note that for each VM I have not assigned a static IP, this is to leave the door open for future additions of more VMs.
At this point we are only able to ping the VMs from the host but not from the VM to the host, due to the nature of the Host-only adapter.


Custom Firewall Setup on Host
To ensure that both VMs can access their respective services securely, I’ve written a custom iptables firewall script on the host machine. Here are some key highlights of the firewall:
- Traffic Isolation:
- DROP as default policy.
- Host machine will forward the VMs traffic. To allow the IPv4 forwarding on the host I have uncommented the following line in the file/etc/sysctl.conf:
#net.ipv4.ip_forward=1 - Mail VM is restricted to accessing email-related ports (IMAP, SMTP, etc.).
- Internet VM is limited to browsing the web (HTTP/HTTPS).
- Both VMs can use the DNS server.
- ICMP Blocking: The firewall blocks ICMP (ping) requests to prevent certain types of network discovery attacks.
#!/bin/bash

IPTABLES=/usr/sbin/iptables
WAN_IFACE="$(find /sys/class/net -mindepth 1 -maxdepth 1 -lname '*virtual*' -prune -o -printf '%f\n')"
LAN_PC='192.168.1.194'
MAIL_VM='192.168.3.192/29'
INTERNET_VM='192.168.4.192/29'

# Set default policies for all three default tables
${IPTABLES} -P INPUT DROP
${IPTABLES} -P OUTPUT DROP
${IPTABLES} -P FORWARD DROP

# -- LAN -- #

# Allow traffic from the mail VM
${IPTABLES} -A FORWARD -p tcp -s ${MAIL_VM} --dport 53 -j ACCEPT
${IPTABLES} -A FORWARD -p udp -s ${MAIL_VM} --dport 53 -j ACCEPT
${IPTABLES} -A FORWARD -p tcp -s ${MAIL_VM} --match multiport --dports 995,993,587,465,143,110,25 -j ACCEPT

# Allow traffic from the web VM
${IPTABLES} -A FORWARD -p tcp -s ${INTERNET_VM} --dport 53 -j ACCEPT
${IPTABLES} -A FORWARD -p udp -s ${INTERNET_VM} --dport 53 -j ACCEPT
${IPTABLES} -A FORWARD -p tcp -s ${INTERNET_VM} --match multiport --dports 443,80 -j ACCEPT
# QUIC protocol
${IPTABLES} -A FORWARD -p udp -s ${INTERNET_VM} --match multiport --dports 443,80 -j ACCEPT
After configuring the firewall rules to control traffic between the host and VMs, it’s essential to understand how the VMs gain access to external networks like the internet. While the VMs are set up using host-only networking for isolation, they still need to communicate with the outside world. This is where Network Address Translation (NAT), comes into play. In the firewall script, I have added the following rule:
${IPTABLES} -A POSTROUTING -t nat -o ${WAN_IFACE} -j MASQUERADE
This MASQUERADE rule performs NAT by replacing the source IP of packets leaving the host’s external interface (e.g., wlp1s0, the wireless interface) with the host’s own public IP address. Here’s why this is necessary:
- VMs using host-only networking have private IP addresses (e.g., 192.168.3.195 and 192.168.4.195), which are not routable over the internet.
- When the VMs send traffic destined for external networks, it is forwarded to the host. The MASQUERADE rule ensures that the outgoing packets have the host’s public IP as the source, allowing them to reach their destinations.
I also added a set of rules to allow all the new and initiated connections, so the VMs can connect to the respectives servers (HTTP servers and MAIL servers).
${IPTABLES} -A INPUT -m conntrack --ctstate ESTABLISHED,RELATED -j ACCEPT
${IPTABLES} -A OUTPUT -m conntrack --ctstate ESTABLISHED,RELATED -j ACCEPT
${IPTABLES} -A FORWARD -i vboxnet0 -o ${WAN_IFACE} -s ${MAIL_VM} -m conntrack --ctstate NEW -j ACCEPT
${IPTABLES} -A FORWARD -i vboxnet1 -o ${WAN_IFACE} -s ${INTERNET_VM} -m conntrack --ctstate NEW -j ACCEPT
${IPTABLES} -A FORWARD -i ${WAN_IFACE} -o vboxnet0 -m conntrack --ctstate ESTABLISHED,RELATED -j ACCEPT
${IPTABLES} -A FORWARD -i ${WAN_IFACE} -o vboxnet1 -m conntrack --ctstate ESTABLISHED,RELATED -j ACCEPT
The next step is to add a default route in each VM, so the VMs know where to send traffic destined for external networks, including the internet. This can be done using the following command:
sudo ip route add default via 192.168.3.193 # On Mail VM
sudo ip route add default via 192.168.4.193 # On Internet VM
Adding these routes, now the VMs are able to ping the host.

Finally I have to add the DNS server in each machine to use the one located at 192.168.1.206. If not, as you can see the VM can’t resolve a given name.

For this task I have created a systemd service that will be executed on each boot on each VM, so I don’t have to worry about it. Here’s the service file for each VM:
[Unit]
Description=Set default network route and DNS
After=network-online.target
Wants=network-online.target

[Service]
Type=oneshot
ExecStart=/etc/setup.sh
RemainAfterExit=true

[Install]
WantedBy=multi-user.target
And here is the script that will be executed on each boot:
WAN_IFACE="$(find /sys/class/net -mindepth 1 -maxdepth 1 -lname '*virtual*' -prune -o -printf '%f\n')"
resolvectl dns $WAN_IFACE 192.168.1.206
ip route add default via 192.168.X.193
Now each machine can interact with the configured services. In my case, after all the configuration is done, I was able to acces the internet from the Internet VM and the mail services with the Mail VM.
Conclusion
This environment provides a secure, isolated workspace where email and web activities are compartmentalized into separate VMs, each with strict access controls. By leveraging VirtualBox, iptables, and systemd, I’ve created a system that enhances security by minimizing potential attack vectors.